I discovered the idea of the loop schedule for homeschooling last spring and i keep coming back to it when my current plan isn't working as well as i'd like. I just finished making mine, and I thought i'd share the awesome benefits of a loop schedule and how I went about making mine.
Why use a loop schedule?
I don't know about the rest of you, but my schedule is PACKED. i'm homeschooling 5 this year, with one in college and one in special ed preschool, and there's a LOT to get done. I find when i'm placed in a box of a list of things to get done, one of two things happens.
1. I rush through our subjects, not giving them the time and attention they deserve, or leave a child not fully understanding a math concept, for example.
2. We give each item on the list the attention it deserves but then have things left over on the schedule undone- which means, we either need to remember to do it on another day- and then get behind on THAT day, or skip it! This is where we usually end up, and it usually means we end up neglecting certain subjects, artist study, art, music, and critical thinking are our go-to neglectees. And as far as i'm concerned that is NOT cool.
How to design a loop schedule?
I read a number of different posts and forum topics on loop scheduling and none were quite what I was looking for, so i opted to reinvent the wheel. Here's what I decided to do, with help from my genius child who has not yet had all his brains sucked out by his children. (he doesn't have any)
Step 1. Make a chart in whatever word processing program you use, I used Word Starter. Make headings of Monday, Tuesday, Wednesday, Thursday, and Friday. (you will end up deleting these)
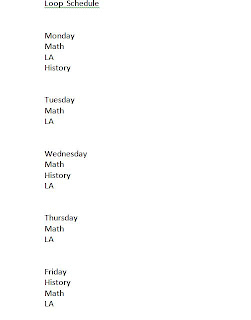
It will look roughly like this-
I kept it small and without a lot of detail so you could see closely what I was doing. The reason I listed headings even though I was going to delete them later, is that it provided me a mental picture of what would be scheduled in that "perfect week" and how to space them evenly. For example, if i were to do history 3x a week, like you see on the schedule, if it were a regular schedule, M, W, F, would work just fine, but since its a loop schedule, the Friday history would be really close in proximity to the Monday history, so what i did was schedule History at the end of monday, and the middle of wednesday, and the beginning of friday. After that, I added in other subjects where they fit best.
Step 2. Remove all the days of the week. Number each item (optional)
Here's what mine looks like.
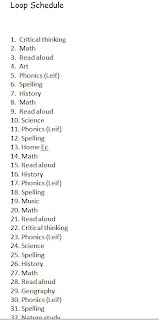
I could BARELY fit it with the snipping tool, so you'll see it started to cut off "nature study"
This gives you a list to work from.
Step 3. Convert to a circle visual (optional)
I am omitting this step for me, because I think the list will work just fine- but if you'd like a visual, this is the idea. It shows you also the problems i ran into trying to schedule straight on the circle and why a list, at least in the beginning is preferable.
Step 4: Make lists of each subject
Finally you just need to make a list of each topic and what you will cover. I've not done this part yet, and i might just "wing it" but i suspect that it will work better if its brainless- So i'll eventually end up making lists, and I'd urge you to do so as well. OR just do the next thing in the subjects where its already brainless, like if you use just one math book. (I like to complicate things by using several, plus living math literature)
How to use your loop schedule
Now that you have a loop schedule, you are all set. Start on number one. Go through as much as you want to on that day. Start over the next day where you leave off. *IMPORTANT* At the start of the next week, take over where you left off, NOT at the beginning of the list or else you will miss out on whatever you didn't get done.
One final note- You may decide there are subjects you just plain want to be sure to cover every day. For us those subjects are Bible, including Bible study, memorization, and alternating days we do Biblical history and Biblical Worldview. So we'd start our loop schedule after the daily items. You may decide LA and Math need to be done daily, which is totally fine. Do them before you start the loop!
Other blog posts on Loop Scheduling
Thanks for reading and good luck scheduling! I'll post later as to how well its working for us!!


